Whether you are completing a new commercial wiring project, renovating a residential space, or organizing loose cables in a workshop, PVC cable trunking is one of the most practical, cost-effective solutions for cable management. This guide will break down everything you need to know about choosing, installing, and maintaining PVC cable trunking, helping you avoid common mistakes and achieve a neat, safe result. PVC cable trunking is a rigid or semi-rigid enclosure system made from polyvinyl chloride, designed to house and protect electrical wires, data cables, and communication lines. Unlike open cable runs or messy exposed wiring, trunking keeps cables organized, protects them from physical damage, moisture, and dust, and improves the overall safety and aesthetics of any space. PVC has become the most popular material for cable trunking due to its unique combination of benefits that outperform many alternative materials like metal or wood. First, we will explore the core advantages of PVC cable trunking that make it the go-to choice for most projects. PVC is inherently non-conductive, meaning it provides an extra layer of electrical insulation that reduces the risk of electric shock or short circuits, a critical safety feature for both indoor and outdoor applications. It is also highly resistant to moisture, corrosion, and UV damage when properly formulated, so it can withstand humid environments like bathrooms, basements, or even covered outdoor areas without warping or rotting. Additionally, PVC is extremely lightweight compared to metal trunking, making it easier to transport, cut, and install on site, which reduces labor time and overall project costs. It is also available in a wide range of sizes, colors, and profiles, allowing you to choose a trunking that blends seamlessly with your wall or floor decor, or matches your specific cable capacity needs. Next, it is important to understand how to choose the right PVC cable trunking for your specific project. The first factor to consider is size: you need to calculate the total diameter of all cables you plan to house, then choose a trunking with at least 25% extra internal space to accommodate future additions or cable replacements. For example, a small 10mm x 10mm trunking works well for low-voltage data cables behind a TV, while a 50mm x 100mm trunking is necessary for carrying multiple power cables in a commercial office wiring system. You should also consider the installation location: wall-mounted trunking typically has a flat profile for a low-profile look, while floor-mounted trunking is reinforced to handle foot traffic, and self-adhesive trunking is ideal for temporary installations or projects where you do not want to drill into walls. For outdoor use, always select UV-stabilized PVC trunking to prevent brittling and discoloration from prolonged sun exposure. Additionally, choose between solid lid and split lid designs: split lids make it easy to add or remove cables later, while solid lids provide a smoother, more finished appearance for permanent installations. Once you have selected the right trunking, proper installation is key to ensuring a long-lasting, neat result. Start by planning your route: map out the path of the trunking along walls, corners, or ceilings, marking cutting points with a pencil, and avoid running trunking near gas lines or water pipes to prevent safety hazards. Before cutting, measure twice to avoid mistakes, and use a fine-tooth hacksaw or PVC cutting tool to get a clean, straight cut that will fit tightly with connectors or end caps. For surface-mounted installation, you can either use self-adhesive backing for lightweight trunking on smooth walls, or use screws and wall plugs for heavier trunking on uneven or plaster walls. When joining multiple sections of trunking, use matching PVC connectors to create a seamless join, and seal any outdoor joints with silicone caulk to prevent moisture from getting inside. Once the trunking base is secured, feed all your cables through the channel, arrange them neatly to avoid overcrowding, then snap the lid into place to complete the installation. Besides installation, proper maintenance will extend the lifespan of your PVC cable trunking and keep your cable system safe. Unlike metal trunking, PVC does not require regular painting or rust treatment, so maintenance is very low-effort. Simply wipe the surface with a damp cloth occasionally to remove dust and dirt, and check for any cracks, loose lids, or damage from impacts every few years, especially in high-traffic areas. If you need to add new cables, just remove the lid, feed the new cables in, and reattach the lid, which is much simpler than accessing cables hidden inside walls. If a section of trunking gets damaged, you can easily cut out the damaged part and replace it with a new section without redoing the entire installation, which saves both time and money. Finally, there are a few common mistakes to avoid when using PVC cable trunking. One of the most common mistakes is choosing a trunking that is too small for the number of cables, which leads to overcrowding, overheating of cables, and difficulty adding new lines later. Another mistake is failing to secure the trunking properly, which can lead to it falling off the wall over time, especially if it is holding heavy cables. For outdoor installations, skipping UV stabilization can lead to the PVC becoming brittle and cracking within just a few years, so it is always worth investing in the correct type of trunking for your environment. Overall, PVC cable trunking is a versatile, affordable, and safe solution for almost any cable management project, and with the right selection and installation, it can provide decades of reliable service. Whether you are a DIY beginner tackling a home renovation or a professional electrician working on a large commercial project, following this guide will help you get the best result from your PVC cable trunking installation.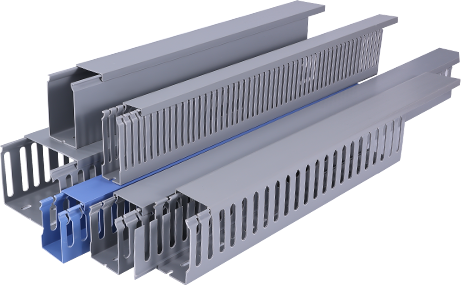
A Complete PVC Cable Trunking Guide for Beginners and Professionals
by
Tags: